The Ronnie (or spinner) rig has actually been around in various forms for quite a while, though it has only reached the mainstream angling population in more recent years. Its popularity has certainly increased exponentially, with many anglers now using it as their “go-to” rig for pop-up presentations.
In this article, we will provide answers to the most frequently asked Ronnie rig related questions and also give you a step-by-step guide on how to tie one of the most devastating pop-up rigs in the world of carp fishing.
The Ronnie Rig: Everything You Need To Know
The Ronnie (spinner) rig is a low-lying pop-up rig, meaning that your hook bait will be presented just off the lakebed. This makes it the perfect rig for fishing over small amounts of weed or detritus.
One of the reasons why the Ronnie rig has become so popular is its ability to reset itself in the event of a carp disturbing your hook bait. The combination of the buoyant hook bait and stiff hook length material ensure that, in most cases, it will always remain distanced from your lead and your hook won’t pick up any debris.
Another reason for the Ronnie rig’s rise to stardom is the fact that you can easily replace your hook without having to tie a new rig (this is particularly helpful after being woken up at 4am by a 3lb bream!)
We get asked a lot of questions about the Ronnie rig, so we will cover them off first before showing you a step-by-step guide on how to tie the Ronnie rig for different fishing situations.
Who Invented The Ronnie Rig?
The Ronnie (spinner) rig was invented by Steve “The Apache” Cliff in 2015. Steve didn’t have a great deal of confidence in the pop up rigs that he had been using, so he set about creating a “go-to” rig that would present his bait perfectly every time.
So why is it called the “Ronnie” rig, if it was developed by Steve Cliff?
That is a very good question! Some sources say that it was developed by Steve and “Ronnie” during their time on Elstow, though Steve is widely regarded as the inventor of the Ronnie rig.
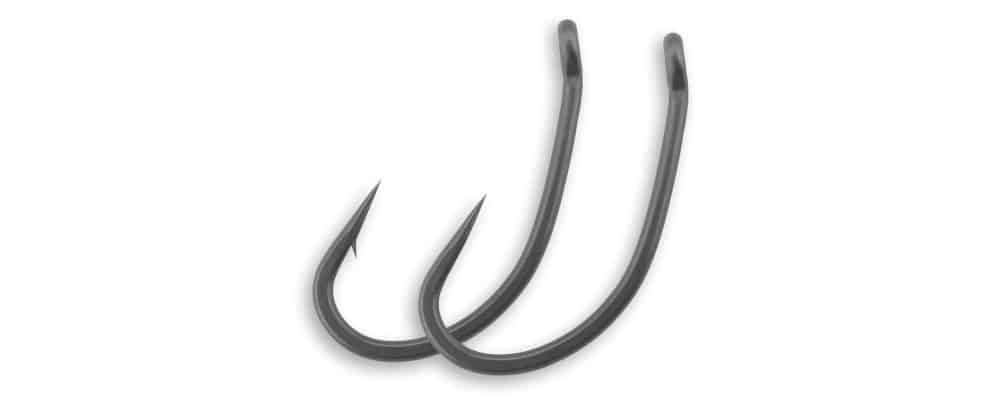
Which Is The Best Hook Pattern To Use With A Ronnie Rig?
A curve shank is the perfect hook pattern to use with a Ronnie (spinner) rig straight out of the packet. The mechanics of this rig ensure that there is a lot of movement, so the exaggerated curve on the shank serves to make the hook flip and, ideally, catch in the bottom lip for a solid hook hold.
However, the “curve” required can easily be engineered via the shrink tubing, so in reality, you can use any hook pattern (within reason). The angle of the rig tubing will ensure that the mechanics of the rig are similar, so this should result in the same, solid hook holds.
What Size Hook Should I Use With A Ronnie Rig?
The most popular size hook for a Ronnie (spinner) rig is either a size 4 or a size 6. I know of some anglers who like to scale things down, so they go as small as a size 8 hook with their Ronnie rigs. Personally, I don’t have confidence in using a hook smaller than a size 6 as I feel that the gape of the hook will be smaller, and will therefore reduce the hooking capability of this deadly rig.
What Size Bait Should I Use With A Ronnie Rig?
This is another question which has no right or wrong answer, and one which will be determined by the confidence of the individual angler.
If you have ever watched ITV’s Monster Carp (or any Korda video which features Tom Dove), you will may have noticed that he almost exclusively uses big hooks and small baits with his Ronnie (spinner) rigs – often pairing a size 4 hook with a 10mm or 12mm pop-up.
Some anglers (myself included) will use bigger baits and then whittle them down into a less-obvious shape, while other anglers will use pop-ups straight out of the tub.
It really does come down to the confidence that you have and what produces results for you. Why not experiment with a different size bait on each rod and see which option yields the most carp?
What Lead Arrangement Should I Use With A Ronnie Rig?
Unless I am familiar with the venue, I will always cast out a feature-finding lead a few times to determine what substrate I am fishing over.
If the bottom is relatively clear I will opt for a lead clip setup, whereas if there is silt or debris present, I will typically choose to fish helicopter style.
The Ronnie (spinner) rig is extremely versatile and will lend itself well to either situation.
What Is The Best Hook Length Material For A Ronnie Rig?
If I am fishing over a clean bottom I will use a fluorocarbon hook length, safe in the knowledge that it will present well. I often use the Ronnie (spinner) rig tidy booms from Gemini Tackle as the technology they use to fuse the loops gives a neater presentation (in my opinion) than knots or crimping.
If I am fishing over silt, low-lying weed (or if I am unsure what I am fishing over) then I will use a soft-coated hook length to ensure that my hook bait is presented nicely, even if the lead has plugged into the bottom slightly.
How Long Should My Ronnie Rig Boom Section Be?
The length of your boom section will depend on what the lakebed is like and what you personally have confidence in.
I know many anglers who prefer to use a boom section of at least nine inches in all fishing situations as they feel that it gives the fish more “rope” to hang themselves with, whereas other anglers (myself included), will adjust things accordingly depending on the individual circumstances.
If the lakebed is perfectly clean, I will use a boom section of around six inches and a relatively heavy lead of 3oz+ to really assist with the hook hold. However, if there is a build up of chod or other detritus, I will extend the boom section of my Ronnie (spinner) rig accordingly.
My best advice here would be to experiment in your own fishing with different boom section lengths to see which gives you the most confidence.
Can I Use A Ronnie Rig In A PVA Bag?
While you can use a Ronnie (spinner) rig in a PVA bag, it isn’t a tactic that I would recommend.
The reason that we use PVA bags is to have a concentrated patch of bait that will encourage carp to get their head down and feed on it. If you introduce an obvious pop-up that is balanced above the contents of your PVA bag, it could spook the more wary carp and, more importantly, I have heard multiple reports of poor hook holds and fish being hooked outside of the mouth.
If fishing with a PVA bag, I would recommend using a KD rig or a simple knotless knot hair rig.
Can I Use A Ronnie Rig With A Wafter?
Yes, you can definitely use a Ronnie (spinner) rig with a wafter hook bait. I have done this myself and know many other anglers who have also fished a Ronnie rig with a wafter hook bait, with great results. However, I would encourage people to use a rig that has been created for the situation, so would always recommend using a German or Turbo German rig when fishing with a wafter.
How To Tie A Ronnie Rig: A Step-By-Step Guide
Without further ado, let’s get started and tie the perfect Ronnie (spinner) rig.
What Components Do I Need To Tie The Ronnie Rig?
- Hook (As discussed, a curved shank is the most popular hook pattern for the Ronnie rig)
- Hook swivel (Most anglers tend to use a quick-change ring swivel, though I personally favour the spinner swivel)
- Shrink tubing (I use 1.6mm tubing with a high shrink ratio, ensuring a snug fit over the hook and swivel), or;
- Kicker (A kicker can be used instead of shrink tubing, making it quicker to change the hook if the point has burred over)
- Bait swivel (I always use a bait swivel and floss my bait on, and I recommend that you do the same. You can use a bait screw, but there is always a chance that it can badly damage the mouth of the carp)
- Hook bead (Choose a good quality hook bead if you are fishing with barbed or micro-barbed hooks, as poor quality hook beads tend to split when passing over the barb)
- Tungsten putty/bead (Applying a small blob of tungsten putty ensures that your hook bait is balanced correctly, though I tend to use tungsten beads nowadays as they don’t fall off like putty does!)
- Hooklength material (If you are fishing over a clean bed, I recommend a stiff or semi-stiff material)
Now that you have all of the components ready, let’s start to construct the Ronnie rig.
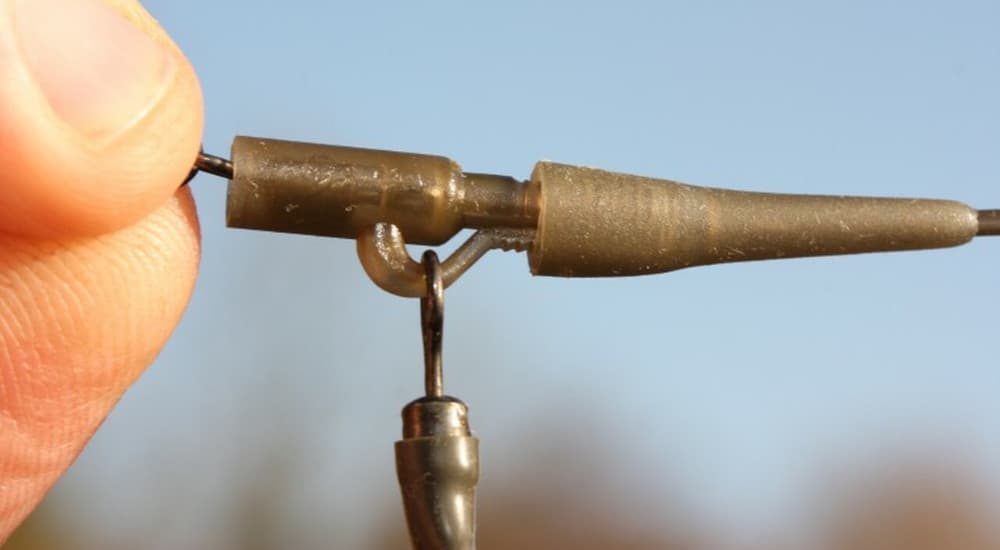
Step 1: Attach The Hook To The Swivel
Take your curved shank or continental pattern hook, your spinner (or quick-change) swivel and cut off approximately 12-15mm of shrink tubing.
Push the shrink tubing over the eye of the hook and up the shank, then place the spinner swivel through the eye of the hook, making sure that the opening of the swivel is on the back of the hook (although it doesn’t happen very often, in a particularly aggressive battle with a carp, the shrink tubing can split and expose the sharp edge of the swivel, causing damage to the mouth).
Step 2: Steam The Tubing Onto The Hook
Now slide the shrink tubing back down the shank of the hook and cover the eye of the hook and the opening of the spinner swivel. You can also cover the barrel of the spinner swivel if you wish (the Ronnie rig has a lot of movement, so this step won’t restrict the motion too much).
Ensuring that the tubing is in the correct position and your hook is sitting at the correct angle, bring your kettle to the boil and gently rotate the rig to ensure that the tubing shrinks evenly over the eye of the hook and the swivel (when carrying out this step, I recommend using pliers or a knot puller to prevent burning your fingers).
Step 3: Position The Bait Swivel And Hook Bead
Now that your swivel and hook are being held in position by the shrink tubing, it is time to fix the bait swivel into position.
Simply thread the bait swivel over the point of the hook and let it rest against the tubing. Then take a hook bead and carefully push it onto the point of the hook, taking care to not push it into your fingers (I’ve done this several times!)
If you are using barbed or micro-barbed hooks, you should thread the hook bead very carefully and slowly over the barb of the hook to minimise the damage to the hook bead (this isn’t a problem if you are using barbless hooks).
The default position for the hook bead is opposite the barb of the hook (if you are using barbless hooks, you should just locate it opposite where the barb would be). Situating the hook bead here will ensure that the curved shank hook maintains an aggressive angle and will turn as soon as the hook bait has been sucked up by the unsuspecting carp!
Step 4: Attaching Your Hook Length Material Onto The Ronnie Rig
If I am tying my Ronnie (spinner) rigs, I will always use a grinner knot to secure my hook length material onto the Ronnie rig. However, you can use any knot that you have confidence in, whether that is the grinner knot, a palomar knot, blood knot etc.
Many anglers like to tie their Ronnie rig using the figure-of-eight loop knot as this creates even more movement to assist in obtaining those perfect hook holds (if you do use a figure-of-eight loop knot, I would recommend tying the hook length material to the spinner swivel first, before following the rest of the steps above).
Alternatively, if you are using a fluorocarbon hook length, you may wish to secure the swivel end and loop end with crimps. Due to its stiff nature, tying or looping knots with fluorocarbon can lead to an untidy presentation.
Crimping isn’t for everyone, and I will admit that I was dubious about the technique before I tried it for myself. However, after testing some crimped Ronnie rigs on my local runs water, my confidence soared and I have gone on to land multiple big fish over the last few seasons without any issues.
Step 5: Balancing Your Hook Bait
Balancing your hook bait when using a Ronnie (spinner) rig can be achieved in various ways.
The weight of the hook and swivel make the Ronnie rig immediately heavier than many other rigs. The balancing of the hook bait will then depend on how buoyant your pop-up is, and how much (if any) putty you use.
If I am fishing over a clean lakebed, I will usually opt to overweight my Ronnie rig. My reason for this is (A) I feel that the additional weight assists with a firmer hookhold, and (B) it minimises movement of the hook bait when carp are in the area feeding aggressively.
Step 6: Go Fishing And Cast It Out!
While there is no doubt it my mind that some anglers are in a league of their own when it comes to watercraft, casting, baiting etc, I also believe that there is an element of luck when it comes to carp fishing, so those who spend more time on the bank are likely to achieve better results.
No matter how good your rig is, you have no chance of catching a carp while sat at home on the sofa! So follow the steps above, tie up some Ronnie (spinner) rigs and head to your local lake to test them out!
Conclusion
The Ronnie (spinner) rig has accounted for a LOT of captures. It has grown in popularity because it is versatile, relatively easy to create and has excellent ability to reset itself.
The step-by-step guide above should help you to create the perfect Ronnie rig and add a consistent pop-up rig to your arsenal.
Have you fished with the Ronnie (spinner) rig? If so, please let me know how you got on in the comments.